 Program Editor
The program editor is used to create and link function blocks.
Pages
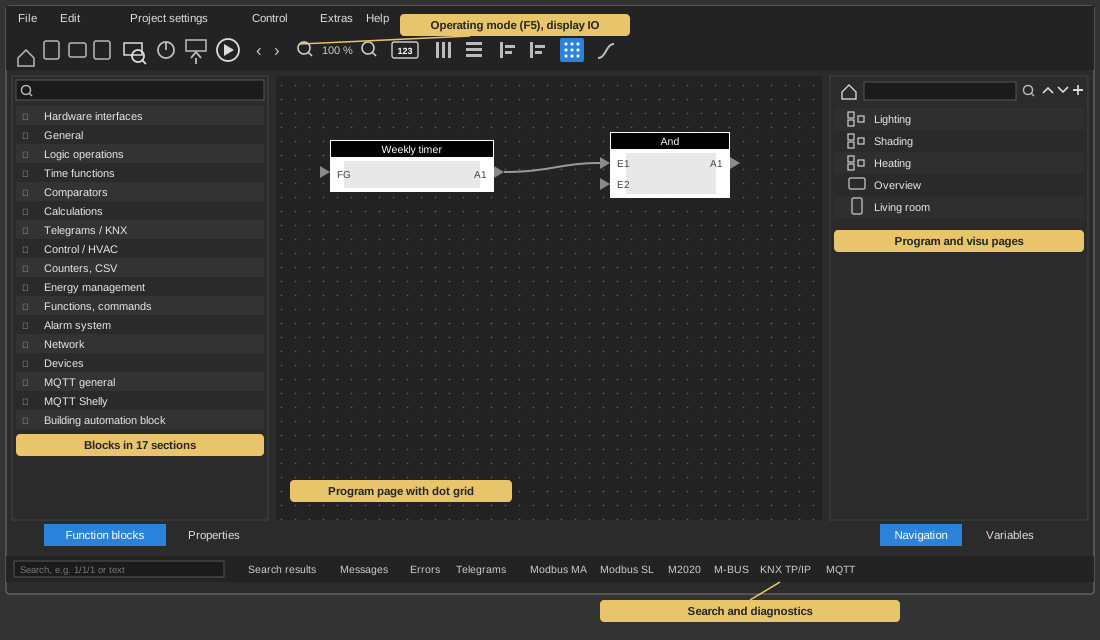
The editor is divided into pages, each page can be considered as a separate
program. The pages are managed on the right in the Navigation
window:
- A new page is created with the "+" symbol – its menu offers New program page (Ctrl+P) and New visu page (Ctrl+N).
- With New folder the pages can
be grouped; entries can be dragged into a folder with the mouse.
- The arrows "Up" and "Down" change the order, the "–" symbol
deletes the selected entry.
- The house symbol on the far left jumps to the start page, the search
field next to it filters the list.
- A right click on an entry additionally offers Rename,
Clone page, Properties
as well as expand and collapse all.
The symbol shows what kind of page it is: program pages carry the block
symbol, visu pages a landscape or portrait rectangle. A program page shown
in red is disabled.
Creating function blocks
To add a function block, select the block in the left-hand window "Function
blocks" and drag it onto the page. Above there is also a search function to
find blocks more easily.
Tip: The view can be enlarged with
the zoom function in the toolbar or with Ctrl + mouse wheel. Zooming always
goes to the spot under the mouse pointer.
The function blocks can only be edited when the operating mode is switched
off. It is toggled with the play symbol in the toolbar or with F5.
If the operating mode is activated, the changes are transferred to the
controller and activated. In this mode only the parameters of the function
blocks can be changed, but no new ones can be added or deleted.
The block on the page
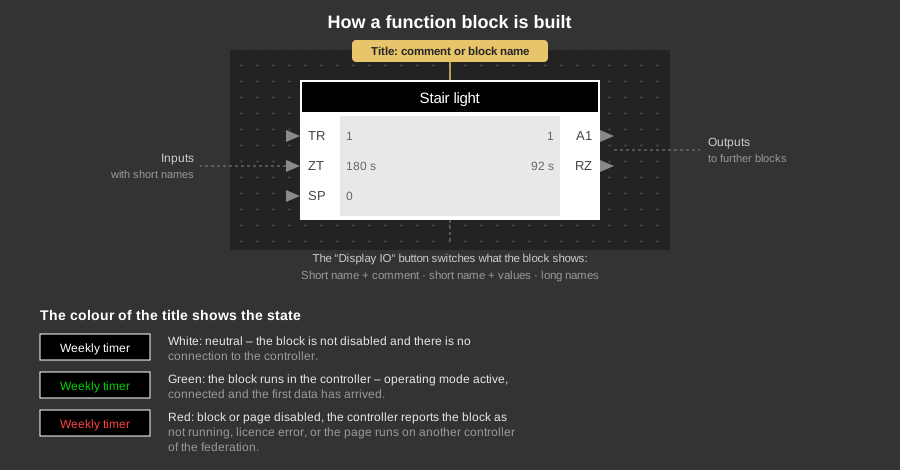
The inputs are on the left, the outputs on the right. What is shown inside
the block is switched with the Display IO
button in the toolbar:
- Short name + comment: the
short designations of the inputs and outputs, below them the comment of
the block.
- Short name + values: instead
of the comment the current values are shown in the block – in
operating mode therefore the state of the system.
- Long names: the full
designations of the inputs and outputs.
Color of the title: The title of the
function blocks indicates the current state by its color:
- White: Neutral, the block is
not disabled and there is no connection to the controller.
- Green: The block is running in
the controller and the first debug data has been received (operating
mode active and connected to the controller).
- Red: The block is disabled,
the page is disabled, the controller reports the block as not running,
there is a license error (then "Licence?" is shown in the block as
well), or the page is executed by another controller of the federation.
Properties, connections and variables
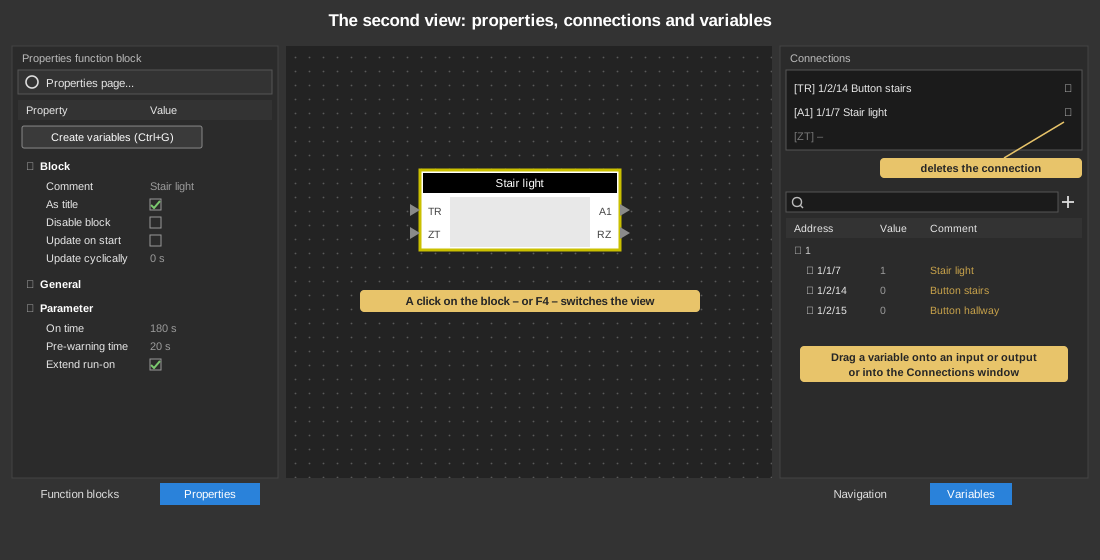
Click on the function block to change the view – F4
(switch view) does the same. By clicking on the page background, the view
changes back to the selection of function blocks.
The properties of the block are displayed on the left, its connections on
the upper right and the variables below them.
Under Block the properties window
shows the general entries such as comment and title, followed by General
and the Parameters of the respective
block. See general parameters.
The properties of the page –
name, start delay, disable and the executing controller – are opened
by the button "Properties page..."
at the very top in a separate dialog. It can also be used when no block is
selected.
The button "Create variables (Ctrl+G)"
creates the matching variables in one go for blocks that support this.
Linking variables
There are two ways to link a variable at the input of a function block:
- Drag the variable from the variable window to the input or output of
the function block.
- Drag the variable from the variable window into the Connections
window.
Multiple selection: If several
function blocks are selected and you drag the variable onto the input or
output of a selected block, it is
linked to the same input or output of all selected blocks of the same type
(e.g. the Brightness input of several Block Switch blocks). Selected blocks
of a different type remain unchanged. The same applies when dropping the
variable in the Connections window. If the variable is dragged onto a block
that is not selected, only this block is linked. When dragging with the Alt
or Ctrl key pressed (automatic linking, see Variables)
only the target block is changed. The linking can be reverted for all blocks
together with Undo (Ctrl+Z).
Tip: It is also possible to link
several inputs and outputs at the same time via the Connections window. To
do this, select several variables in the variable window and drag them into
the window with the links, the variables will then be linked in sequence. If
several blocks of the same type are selected, the dropped links are set on
all selected blocks.
Connecting blocks directly
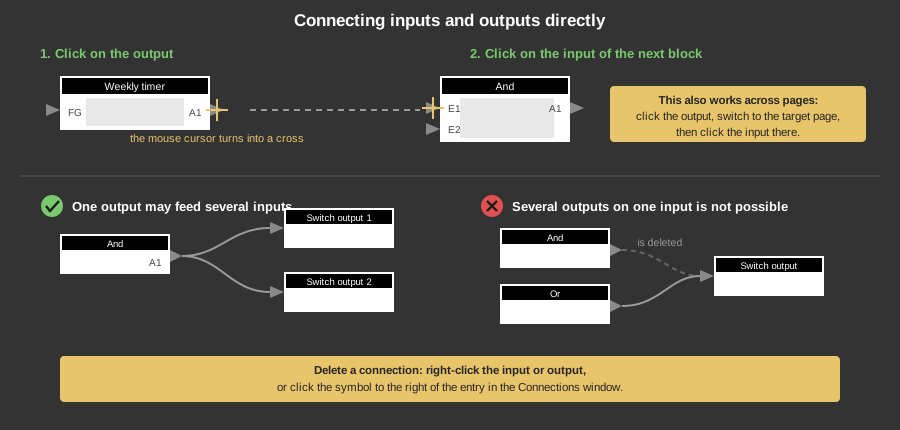
Inputs and outputs of the function blocks can also be connected internally
without variables. To do this, click on the output of the first block (a
cross is displayed as the mouse cursor) and then on the input of the next
block. This is also possible across pages: click on the output again, then
switch to the target page and click on the input there.
An output can also be linked to several inputs. Conversely, it is not
possible to link several outputs to one input: if another output is linked
to the same input, the previous link is deleted. To delete a connection,
click with the right mouse button on the corresponding input or output of
the function block, or in the Connections window on the symbol to the right
of the entry.